Showing posts with label Manicure. Show all posts

Friday, August 3, 2012

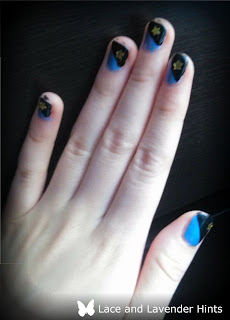
Day and Starry Night Nails

        Seeing as I haven't posted a nail design in a ridiculously long time I figured it was about time I set about doing a blog-worthy manicure. This design was actually inspired by star confettti that I had gotten in one of my birthday cards and of course managed to get everywhere. Like glitter, confetti just never seemes to go away, everytime I think I've found all of the bits and gotten them tidied into a container I discover another sneakily heading under a book on my desk. That being said let's get this nail design started!

Nail Polishes I Used

  • Sally Hansen Ultimate Shield Base and Top Coat
  • Avon Lagoon
  • Sally Hansen Lustrous (the black polish)
  • Star confetti (can be found at local craft stores)

Let's Get Started!


Step 1: Paint all of your nails a light blue base coat, something that resembles a clear blue sky.


Step 2: Paint half of your nails black diagonally by painting the black polish from one corner of your nail to the opposite corner.


Step 3: While the black nail polish is still wet place one of the confetti stars in the black portion of your nails using tweezers. Press gently on the confetti star so that it is relatively stuck in the black polish.


Step Four: Using a gold striping tool, or a thin paint brush dipped in gold nail polish make small dots around the star in the black portion of the nail to create the idea of smaller stars twinkling galaxies away. When your nail polish is dry paint a top coat over your design to ensure that it last as long as possible.


If you decide to try out this design, I'd love to know how it goes!

Thursday, July 12, 2012

Fading Green Glitter

     While perusing the internet for a new, different nail art design that I hadn't tried before I came across a youtube video published by, frmheadtotoe (From Head to Toe), which showed how to do a fading effect on nails (she referred to it as the gradient effect). I've seen this technique used quite a bit in various nail art blogs and so I decided I should finally give it a try. To see frmheadtotoes's video click here.
The finished fading effect on my nails.

Nail Polishes I Used:

  • Sally Hansen Ultimate Shield Base and Top Coat
  • Wet n Wild Wild Shine in Hallucinate (Sparkley polish)
  • Simply Sweet (the green nail polish, no colour name was given on the bottle)
  • Sally Hansen Clear

Let's Get Started!


Step 1: Paint all of your nails with a clear polish to protect your natural nail and to add shine to the lower portion of the nail which won't be painted with the coloured polish.

Step 2: Using a translucent (not opaque) polish (I used the simply sweet green polish), paint the top three quarters of your nail making sure you have left a portion of your nail unpainted near the base;  do not paint the entire nail!

Step 3: Next paint a second coat of your coloured polish in the top portion of your first coat. Make sure you leave the lower part of the first coat of polish visible.


Step 4: Continue this pattern of painting just above the bottom of the previous coat of polish until the tip of your nail has a much darker colour than the base.


Step 5: Add Sparkles!!!!! Paint a sparkly coat of polish over the entire nail once it has dried to make the fading appear more natural and thats it, you now have a beautiful fading effect on your nails!

Saturday, June 2, 2012

Crackled Glitter


       With summer fast approaching its time to get your footsies sandal ready! Its important to make sure that you give your feet a good soak to start off your pedicure and always remember to file your nails straight across; nobody wants an ingrown toenail, ewww!

Nail Polishes I used:
  • Sally Hansen Ceramics in Coral Pink
  • Avon Crackle in White
  • Sally Hansen Ultimate Sheild Base and Top Coat
  • Lin Striping polish in Silver
Step 1: Paint your toes with two coats of Coral Pink nail polish

Step 2:  Using the striping tool paint a diagonal silver line from one corner of your nail to the opposite corner.


Step 3: Paint a thin coat of the white crackle beneath the silver line. Then paint a top coat to seal in your design and your toes are sandal ready!

Monday, May 21, 2012

Pretty Polka Dots


    Yeh I know, glittery copper polish is more of a fall/winter trend but, what's a girl to do if she feels metallic in the spring but go with it! This design is pretty simple, its great if you're just learning how do nail art or if you don't have the time to do realy intricate nail designs. I quite like this design because it incroporates the polka dots I loved when I was smaller without seeming too kiddish.

Nail Polishes I Used:

Revlon Limited Edition Copper Gleam
Sally Hansen Hard As Nails White Tip
Sally Hansen Ultimate Shield Base and Top Coat


Step 1: File your nails and paint them two coats of Copper Gleam

Step 2: Using a dotting tool make three white polka dot from one corner of you nail to the opposite corner of your nail in a diagonal line

Step 3: Paint on a top coat.

Its that easy, just 3 steps and you have a pretty polka dot nails!

Do you like the colour? Should there be more polka dots? Let me know what you guys thought of this design!


Wednesday, April 25, 2012

Heart Nail Art

 
   One of my favourite ways to treat myself after a stressful day is to grab a bottle of nailpolish, whip up a hand soak and begin an at home manicure session. I do enjoy going to nail salons on occasion but going out too often to get your nails done at a salon can be pricey. And lets be honest, sometimes you'd much rather stay in your pyjamas or a comfy sweater and stay at home!

   The first step in any at home manicure session should be a hand soak. Not only is taking the time to enjoy a hand soak relaxing but, I've found that it actually improves the condition of my nails; especially after removing nail polish. You can purchase premade handsoaks at most stores but if you're in the mode for an entirely DIY manicure why not try the recipe I used for my handsoak?

Recipe for a Simple Homemade Hand Soak

1. 2 tbsps of cream
2. 1 tbsp of honey
3. Your favourite liquid soap (I used softsoap mango infusions)
4. Medium size bowl of hot water

    Mix all of the ingredients together until there are lots of bubbles, place your hands in and relax while the soak refreshes and soothes your hands.


Once your done soaking your hands and filing your nails its nail polish time! If your looking for a design that has a bit of sparkle and love to add some glitter to your nails check out my Heart Nail Art Design below!


Paint your nails a base colour (two coats should do it)
My base colour is, 'Viva Pink' Avon Nailwear Pro


Make two white dots using a dotting tool on the corner of your nails
Make a third dot beneath the two dots
Fill in the space around the dot carefully using a toothpick


Using the dotting too,l make a series of small dots across the tip of the nail


Paint red sparkly polish over the heart and dots to give them extra sparkle
When this has dried, paint a single coat of the red sparkly polish over the entire nail
The red sparkly coat I used was, 'Gettin' Miss Piggy With It' OPI


Use a Q-Tip dipped in nailpolish remover to clean up any nailpolish around your nail and Voila!
You have Heart Nail Art that will have all your friends believing you went to the nail salon!